Background

Friday, December 28, 2012

Boa Valentine's Day Wreath

Well Christmas is over and I am feeling that sad lull that only comes from not having a holiday to look forward to for awhile. Plus, winter holiday crafts are just the most fun to make. Then I thought...why should I wait to start crafting for my second favorite holiday: Valentine's day! It's only two months away!! (:

Pinterest often has 'boa wreaths' and most of the time I do not care for them, mainly because most of them are just wrapped around boa and nothing else. I was a bit apprehensive about trying one myself, knowing that the fluffiness of the wreath would make it hard to attach any embellishments (glueing to  boa fabric is not going to happen, by the way...I have tried many times). Then I though why not use straight pins to add embellishments like I do for all my other wreaths. So, here is my first wreath for the Valentine's day season...


Michael's had a sale on craft Boas. If you go to their holiday Valentine's day sections they have them there. Each strand was about eight feet long and the wreath is 14 inches. It took me eight of the boas to fill in the wreath. As far as the embellishments are concerned I decided to use my cricut to make small periwinkle flowers, using straight pints in the middle so it looks like pollen. I also couldn't make a Valentine's day wreath without a heart. I straight pinned the heart into my wreath and then covered up those pins with a periwinkle flower. If you don't have a cricut you can just use a Martha Stewart flower stamp. The stamp is about ten dollars.


I tied a ribbon behing the wreath with straight pins and then added a decorate bow to the top of the hanger to help hide the nail I put in the wall.
This is a great project to do with your kids, especially for the first part of this craft. Wrapping the boa around the foam wreath is easy and convenient for you to fix if there are a few mess-ups along the way.

Here is what you will need:
14 inch foam ring
8 packages of boas (about 8 feet long each strand)
Pink, White, Red craft paper (or any color that will match the color of your boa, this is for the flowers and the cutout heart)
Straight pins that will look like pollen
Ribbon
A cricut (for flower embellishments) or flower stamp

Thursday, December 20, 2012

Nine Patch Quilt

For today's post I decided to share with you a gift I made for my sister...it's my take on the nine patch quilt. We promised each other that we would make a quilt for one another and exchange. Yeah, well, they were supposed to be fall quilts but we both became super busy. However, the quilt did make it to her for the winter season and that makes me happy! Here it is...
I wish I felt comfortable showing you a close-up of it, but I'm afraid I made too many errors when creating this quilt. So, just enjoy it from afar (as it is meant to be enjoyed). The material was, to me at least, an assortment of fall colors. I do think it will still work for the winter/holiday season as I added a lot of reds and greens to the mix. I was also trying to create a nice symmetry between the lighter and darker patches. A cautionary tale must be made, however. When sewing small squares line them up in rows of the width of your fabric and then cut them out (here's a good place to go for help on this issue ehow). The biggest problem with this quilt is that I had squares already cut out from a previous project and thought I was 'that' good...I wasn't, sadly. 

This quilt also needs better edging, but as luck would have it my sewing machine crashed and burned before I could put any borders around the sides. I think fate is telling someone to buy me an expensive sewing machine for christmas (any takers?). The great thing about the nine patch quilt is that it is fairly easy for beginners and there are endless possibilities. I have only been sewing for two years now and was able to design my own quilt using the basic principles for this pattern.

Wednesday, December 5, 2012

Another Christmas Tulle Wreath--Snowflake Edition

OK this is my last tulle wreath--for awhile, anyway. I just had to make this one after being inspired by a similar wreath I saw on pinterest, and, luckily enough, I think the lady who makes a snowflake inspired tulle wreath has an etsy site you can buy one from (just in case you don't want to create your own right now). So here's how it came out looking...

I feel that the tulle colors I chose were a great blend of light blue and white to represent the snowy, snowflake theme I was going for. However, I forgot, oops, to paint the green foam wreath before tying the tulle onto the foam. Therefore, there are bits of green around the edges that make me upset, but not upset enough to start all over again. :o) I used regular craft glue to stick the snowflakes onto the wreath, but I feel fabric glue would have been much better since they didn't stick as well as I would have liked.
I also feel that it would have been better to have bought double the amount of snowflakes and made a more layered look. It looks, to me, a little empty around the edges. I also used some left over tulle to braid and pin to the top of the wreath to create an easy hanger.

I thought about blending the white and blue tulle for the braid, but since the blue and white were so close in color I just left it a single color (It wouldn't have much contrast between colors, in other words). Overall, a fun and cheap project.

Items needed:
Four rolls of tulle (two light blue and two white, 6 in. wide and 25 feet long. I cut my tulle at 14 in. a piece. For a fluffier wreath add a few inches).
Two packages of snowflake ornaments (found mine at Michael's for 2.99 a package)
16 in. foam wreath
Craft glue
Four straight pins (to hold the braided hanger in place)

Saturday, November 17, 2012

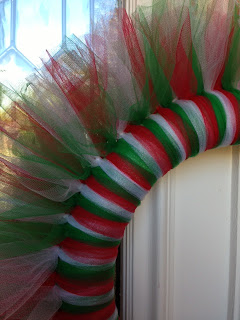
Christmas Tulle Wreath

I know, I know. I just did a tulle wreath...where is the quilting stuff?? I'm sorry to disappoint, but right now I am on a tulle kick. In fact, it is getting close to an addiction. If you have ever created a tulle wreath you know that the calmness it can provide by wrapping little pieces of fabric around foam...well...there's nothing like it. Sometimes I find that wrapping a piece of that beloved fabric almost takes me to a state of Nirvana. Sorry about these comments...I am not as completely freaky as I am coming off to be right now. However, I think a completely normal person would find tulle wreaths to be very fun and an entertaining past time. Ok, so here is my first tulle christmas wreath. Yes, you read me right. There is currently one more christmas tulle wreath in the making.
So, overall, I am pretty happy with my color choices. Except I kinda feel the little .49 cent gingerbread house sits lonely on the wreath. It may look better if it was sitting in a round of tulle and then glued onto the wreath. What do you think? I do love the color choice. I believe they hid the green foam wreath beautifully, which makes me happy because I didn't have to paint the foam or round it with ribbon before starting the tulle wrapping process.
Also, another great idea, which came from my mother, was to use the left over tulle material and braid it. Then pin the ends of the braid to the back of the wreath, making for a very convenient hanger.
Material needed:
3 rolls of tulle (6 in. wide, 25 feet long...you'll have a little extra for future tulle projects)
1 16 in. foam wreath
1 wooden embellishment or anything of your choosing
Glue (I just used plain Elmer's glue to glue my gingerbread house and it seems to be sticking)
Straight pins (pin the back of the braided tulle to the wreath)

Wednesday, November 7, 2012

The Tulle Wreath

I decided to make my sisters some tulle wreaths (just a fun little gift to tell them I loved them). There are so many different ways to create them. If you go on pinterest, or etsy you'll see the variety. However, I decided to do mine the traditional way. I chose the colors teal, black and white to go with the the color scheme of my sister's room and included a hanging letter initial in the middle. Of course, you could attach the letter to the wreath itself using some hot glue. 
I used about 16in. long strands of each color to wrap around a 14in. foam wreath. If you use lighter color tulle you will need to paint the foam the corresponding color of the tulle (lighter color tulle will reflect the the color of the foam you wrap the fabric around). I chose a four inch wooden letter and painted it with teal craft paint. I also chose to use some black and silver bling embellishments over my wooden letter. Who doesn't love some sparkle?? I screwed in a metal eye hook to the top of the letter and hung the letter from leftover tulle fabric, tying it to the top of the wreath. 

What you will need:
A wooden letter 4 in. (they are super cheap, like only two dollars a piece)
Some craft paint
3 rolls of tulle (25 ft. and 6 in. wide.) 
14 in. foam wreath
Eye hook

I would highly suggest buying the tulle from Fabric.com. They have rolls for around three dollars and the rolls are a life saver. Trying to cut tulle is the hardest part and since the roles are 6 inches wide you only have to cut length ways. 

Monday, November 5, 2012

Variation on the Bag Wreath

The paper bag wreath, sometimes called the newspaper wreath, is a cost-efficient and fun craft for any season. The idea is to use recycled paper in your home and create a masterpiece that is environmentally friendly. I was not so eco-conscience in my creation, using some store bought Christmas paper. However, it was a money saving creation. I only needed one pack of 24 sheets of paper and, happily, the paper was on sale.
The only thing needed for this project is the following:
24-40 sheets of sorted paper (the thinner the sheets the better)
Scallop circle punch (2.5 inches)
Box of assorted straight pins (around 50)
14 in. foam wreath
Ribbon (for hanging)

In order to make the rose petals you need only stamp out the circles and use the end of a dull pencil, folding the circle around the pencil until several creases are formed. Then, using the straight pins, stick a pin in the center of each pre-made circle and stick into the foam. Some people also use a hot glue gun for this process, but I find that if you hate where you place a scalloped circle you can easily remove a pin and repeat the process (glue is a little too permanent for me). Just make sure to use thin paper, because the thicker the paper the harder to fold and the more difficult to squeeze each circle next to each other. I then pinned the ribbon to the top of the wreath for an easy hanging design.
The whole process should take you around two hours! In the end you have a fun and budget-friendly decoration.